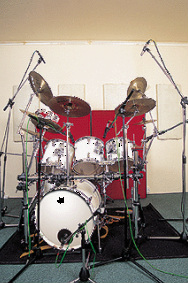
Miking up a drum kit can be one of the most time consuming and frustrating instruments to record. There are several ways to record drums, from using only one microphone to using one or more microphones in each drum component.
If we want to record the drums with only one microphone we should use a large diaphragm condenser microphone set to cardioid polar pattern. This kind of microphone gives us clarity and the high frequency response required to record the cymbals and hi-hat. The mic should be placed over the kick drum pointing at the snare drum. Although the microphone is set to the cardioid pattern and is focusing on the snare drum, there is enough spill from the rest of the kit that enables the microphone to pick all the other drum components. If the condenser mic has a -10dB attenuation switch, it should be switched on in order to avoid distortion in the sound. http://www.youtube.com/watch?v=iS_YZpn818A
Although miking up the whole kit with only one mic is a much quicker process, it is worth spending some time miking up the whole kit as this will produce the best results. The choice of microphone and its position will define the sound of each component. In order to capture a natural drum kit sound, we can use a high quality condenser mic positioned overhead, in front of or behind the kit. The mics used for this purpose include the Neumann U87and KM84, the AKG C414B and C451. Usually the overheads capture enough cymbal sound therefore it won’t be necessary to mic the cymbals individually.
To record the bass drum we want a robust microphone that will have a great low frequency response. The AKG D112 is a large diaphragm dynamic microphone and is specially designed to record the kick drum. If the front head of the kick drum has been removed or if it has a large enough hole in it, the mic should be placed inside close to the beater head about halfway between the centre and the edge. In addition to this microphone we can use another dynamic microphone further away from the beater head. Trying different positions of the mics is always a good idea in order to get the best sound.
Although the snare drum can be recorded with a condenser microphone like an AKG C451, the most common approach is using a dynamic mic like the Sure SM57. When using an SM57 we get a fatter and bigger sound than when we use a condenser. It is also much easier to control the signal as dynamic mics are less sensitive. It is a good idea to use two mics on the snare: one on the top; and one below to capture the sound created by the rattle. The mic on the top should be placed near the edge because a fuller range of overtones is present in this area. This approach also minimizes the changes of it getting it. The microphone positioned below the snare should be placed about 20 cm away from the rattle halfway between the edge and the rattle. When using a mic below the snare, its polarity should be switched to the opposite polarity of the one on the top.
Usually there is enough hi-hat sound captured by the overheads but we can mic it up individually for better clarity and control. To record the hi-hat we can use a small diaphragm condenser mic, placing it about 10-15cm over the outside edge of the hi-hat. The mic should be perpendicular to the the hi-hat pointing down. In order to avoid the sound created by the snare the mic should be placed on the side that is furthest away from the snare.
In order to mic up the tom-toms we can use a similar approach to the one used on the snare drum with dynamic mics positioned over the rim pointing to the centre of the head. The rear of the mic should be angled up to reject the sound produced by the cymbals (note that the cymbals radiate sound in a figure of eight pattern above and below the metal plate). In terms of microphones we can use a dynamic microphone like the Sennheiser E604.
Here is a video that shows some of the approaches mentioned above for miking up a drum kit
http://www.youtube.com/watch?v=TD1_SwHEs4A&feature=related
For more information click on the following links:
http://www.soundonsound.com/sos/feb03/articles/drummiking.asp
http://www.soundonsound.com/sos/jul99/articles/recordingdrums.htm
http://www.soundonsound.com/sos/aug10/articles/drum-tuning.htm

 RSS Feed